Friday, January 5, 2018

DIY Playroom Storage Labels

It's finally January! While I love the Christmas season, I also love to pack up the decorations and tree, (#teamfake) and see some space in our house again. It's also time to take inventory of all the new toys my kids have acquired over the holidays and help them to find a home!


When we moved into our current home, it had this great little formal dining room off the kitchen, for which I had no real use. By the time my oldest started toddling, we I purchased some Ikea Expedit shelving units and turned the space into a playroom, where I could watch the kids while I cooked.


It's a small space, and it is fully visible from the front door. My desk and computer also live in this space. So, naturally, I like to keep it tidy and organized since we're looking at it all day!


While the Ikea Expedit shelves (which have since been replaced with the Kallax line of shelving) match with an adorable line of perfectly fitting bins and baskets, they just weren't right for our space - both in price and style. I knew they wouldn't be easy to see into or for little hands to put back (which leads to toy dumping). 


These Dollar Tree bins were a great alternative both in price and in style. I like that they are smaller than each cubby so that you can easily add toys or see what's inside without removing the bin completely from the shelf. Other toys fit really well into these pretzel barrels we had collected over the course of a year (that's a lot of pretzels!).


I've had these same labels for several years, but about once a year, I like to reassess the toy categories and change things up. My boys are three and five, so Lego, Nerf, and board games are big for them this year. I needed to add in a few more labels and remove others.


To give my labels a cohesive look, I used my Silhouette Cameo to make some simple black and white labels, inspired by the chalkboard look. I used heavyweight black cardstock that came in half sheet sizes from Michaels and white Oracal 651 vinyl


In Silhouette Studio, I designed the labels with a simple, easy to read font. This one is called Jasmine UPC. I also drew boxes around each word so that I could weed each word individually.


After cutting, I weeded out the words, put some clear transfer tape over the top (I use this brand), and transferred the word onto each black piece of cardstock. 


This little one also wanted to help make labels, so he got some cardstock as well!


I took the project a step further and laminated each label with this laminator to make them even more durable (have I mentioned I have boys?). 


A few hole punches and some twine, and my labels were ready to add to my bins. The Lego label was going on a different type of container, so I trimmed the card stock before laminating and used my Xyron Creative Station to add an even coating of adhesive to the back. It stuck to our Lego tote perfectly. 


I love reusing containers in creative ways. If you look closely, you'll also see an animal cracker bin for our Jenga blocks and an almond container for our ABC blocks. Often times when organizing, it's tempting to go out and buy all new. But I challenge you instead to edit your collection first, and then see what containers you already have. If I find myself wanting to go out to buy an organizing tool or container, it's a clue that I have too much stuff!


For some people, this style of toy storage is too many categories, but it seems to work really well for us. Although my kids are preliterate, they know what goes in each bin and can easily find the toy they are looking for (no dumping necessary!). And it's less overwhelming to clean up when they can see clear categories and can visually break down what has been left out. Instead of #allofthetoys, they see a few categories: Nerf guns and cars.

Hope you enjoyed my play room tour and label tutorial! It's not the most glamorous or Pinterest-worthy, but it is functional and neat. And most importantly, it's a place my kids want to play! How do you store and organize toys?

Sunday, December 24, 2017

DIY Gratitude Jar with Silhouette Cameo


My husband's Aunt Betty was telling me about a gratitude jar the last time we were at her house. It's a jar to which you add a piece of paper every day after jotting down something you're grateful for. At the end of the year, or even just on a tough day, you can dig into the jar and read all the many things you were grateful for throughout the year. I loved the idea! And she hinted that it was maybe something I could make with my Silhouette Cameo. Challenge accepted!


We're heading to her house for Christmas Eve tonight, and I'm putting together a gratitude jar for her as a hostess gift. I'll show you all the steps below for this 30 minute DIY!


I started with a Ball smooth-sided, wide-mouthed quart mason jar. I like how the opening is wide enough to fit your hand and the sides don't have a raised design to get in the way of a vinyl sticker.


I used a few designs from the Silhouette Studio store to make a design on the jar that says, "Grateful, Thankful, Blessed," with a laurel on the bottom and a small heart to fill what was an otherwise empty space. 

I decided to go with white vinyl, because white is classic, subtle, and matches all decor. Plus, it would go great with the rose gold Rustoleum spray paint I had picked out for the lid!


I used a 4"x5" scrap of permanent adhesive vinyl (I used Oracal 651), and taped it down to my cutting mat with a little washi tape. I like to do this with smaller cuts of vinyl because I'm using an older mat with less stick, and it keeps the vinyl from shifting around during cutting.

Next comes the weeding. That's the crafting term for removing all the teeny tiny pieces of vinyl, like the tiny circle in center of the letter O.


This piece had lots of itty bitty weeding to do! Strong overhead lighting and a hook tool from Silhouette make quick work of it. And it's actually pretty relaxing.


I put a piece of clear transfer tape on top. I like this kind from Craftopia, because it is clear and has guidelines to keep your image straight. Plus it comes with a free burnishing tool!


Burnish the whole thing with a scraper tool like this one from Craftopia (or credit card) to help the transfer tape adhere to the design, and slowly peel it up, making sure every letter sticks!


I laid the jar in my lap between my legs to keep it still and straight while I centered the vinyl. Once it was stuck on there, I burnished it one more time and carefully peeled back the transfer tape, making sure all the letters stuck to the jar.


One more step: spray paint the lid! Mason jar lids typically come in two parts: the lid and the ring. I separated them and gave them both a quick two coats of rose gold spray paint. This went on smoothly and only took about 30 minutes to dry (although I let it sit a little longer just in case). 


To wrap it up, I stuffed the jar with some teal paper to let the design pop, and added a small pile of cards to use for daily gratitude notes. 

I hope she likes it!


Thursday, December 21, 2017

Easy Christmas Craft with Kids: Nativity Scene Foam Stickers with an Upgrade!


I love crafting with my kids, but I have certain rules:

1. It has to be washable

2. No glitter (good God, no glitter! Have I mentioned I'm a bit of a neat freak? No? Hi, nice to meet you...)

3. It has be completed in 20 minutes or less.

This craft accomplishes all three, plus they got a little reinforcement of the true meaning of Christmas. 


When I was at Michael's last week, I came across this package of foam stickers meant for a nativity scene. They were 60% off, so I grabbed them knowing we would need lots of fun activities to stay busy this week without school.


Meanwhile, I had these neat little pine boxes I had been saving from a prepackaged Melissa & Doug craft set that my aunt had given the boys for their November birthdays. I knew they would come in handy for something, so I held on to them.


When I had the foam stickers at home, I realized how perfectly the two items came together! The pine boxes, turned on their sides, would be the perfect little nativity scene to house Mary, Joseph, and Baby Jesus. Add a few popsicle sticks and some hot glue, and we could even make a roof!


I had envisioned also painting them, but the kids were eager to get to sticking the stickers on once they saw the completed houses. 


The set came with enough stickers to make at least six more scenes, so this will be a great little craft project to do when friends come over, too! 


Materials:
- Foam Stickers or Regular Stickers of Nativity Scene Figures (or you can draw them and cut them out from paper!). Mine are from Michael's, but you can get similar ones from Oriental Trading Company here.

- Small wooden or cardboard boxes (a kid's shoebox would work, too!)

- Wooden popsicle sticks

- hot glue gun and glue sticks

- crayons, markers, paints, and other creative materials

Instructions:
1. Turn the box on its side so the opening is facing you. Glue the popsicle sticks on top of the box to make a roof shape. Add some sticks to the backs and sides to reinforce, if necessary. I also added a few extra globs of hot glue to all the corners where the popsicle sticks met for extra stregnth.

2. Paint the box and roof if you like, using markers, crayons, or washable paint. Let dry.

3. Add the stickers.

4. DONE!

Monday, December 11, 2017

Christmas Craft Night: Mason Jar DIY


I had so much fun hosting last year's Christmas Craft Night, where we made these adorable "Season's Greetings" card holders, that I knew it was going to be an annual tradition.

I loved how our fall craft was open ended and had so many possibilities, so I wanted to do something similar. Everyone gets the same items and we can make them all our own! That vintage, farmhouse, rustic feel is super popular this year (thanks, Joanna Gaines!), so the mason jar was the clear winner among my girlfriends.

Each guest got three mason jars (I picked Ball wide-mouthed smooth-sided quart jars from Target) and #allofthesupplies. Ten ladies came, and they each chipped in $10 for the jars and extras.


Of course, a few weeks ahead of time, I shared endless links to ideas across the internet. Who knew there were so many Christmas craft ideas using mason jars? I also cut a few decals using my Silhouette Cameo 2 using removable vinyl to use as stencils on our jars. 


As usual, the results were amazing! Admittedly, we had a few #craftfail moments. Turns out the acrylic craft paint we used needs to be super wet or completely dry before peeling off the decal stencil. A few of us peeled it up when it was a bit tacky with some messy results! Nothing some touch ups with a small paint brush couldn't fix though. And it adds to that "rustic" vibe we're all going for anyway, right??


And then my silly friends knew how much of a clean freak I am and snuck out to my front lawn in the dark to use fine glitter. Turns out using adhesive spray near your hands while glittering can lead to some sparkly fingers long after the party is over! Side note: my lawn still looks pretty magical...


Also, who knew that epsom salts can look like snow? Some used it to coat the outside of jars, and others used it at the bottom of their jars to hold a tea light candle in place. 


A few of us used the letters J-O-Y on our jars to make candle holders. Mine were painted in white with a gold glittered lid. But it was looking a bit bland once it hit my mantle, so a few sprigs of faux winter berries transformed them into vases.


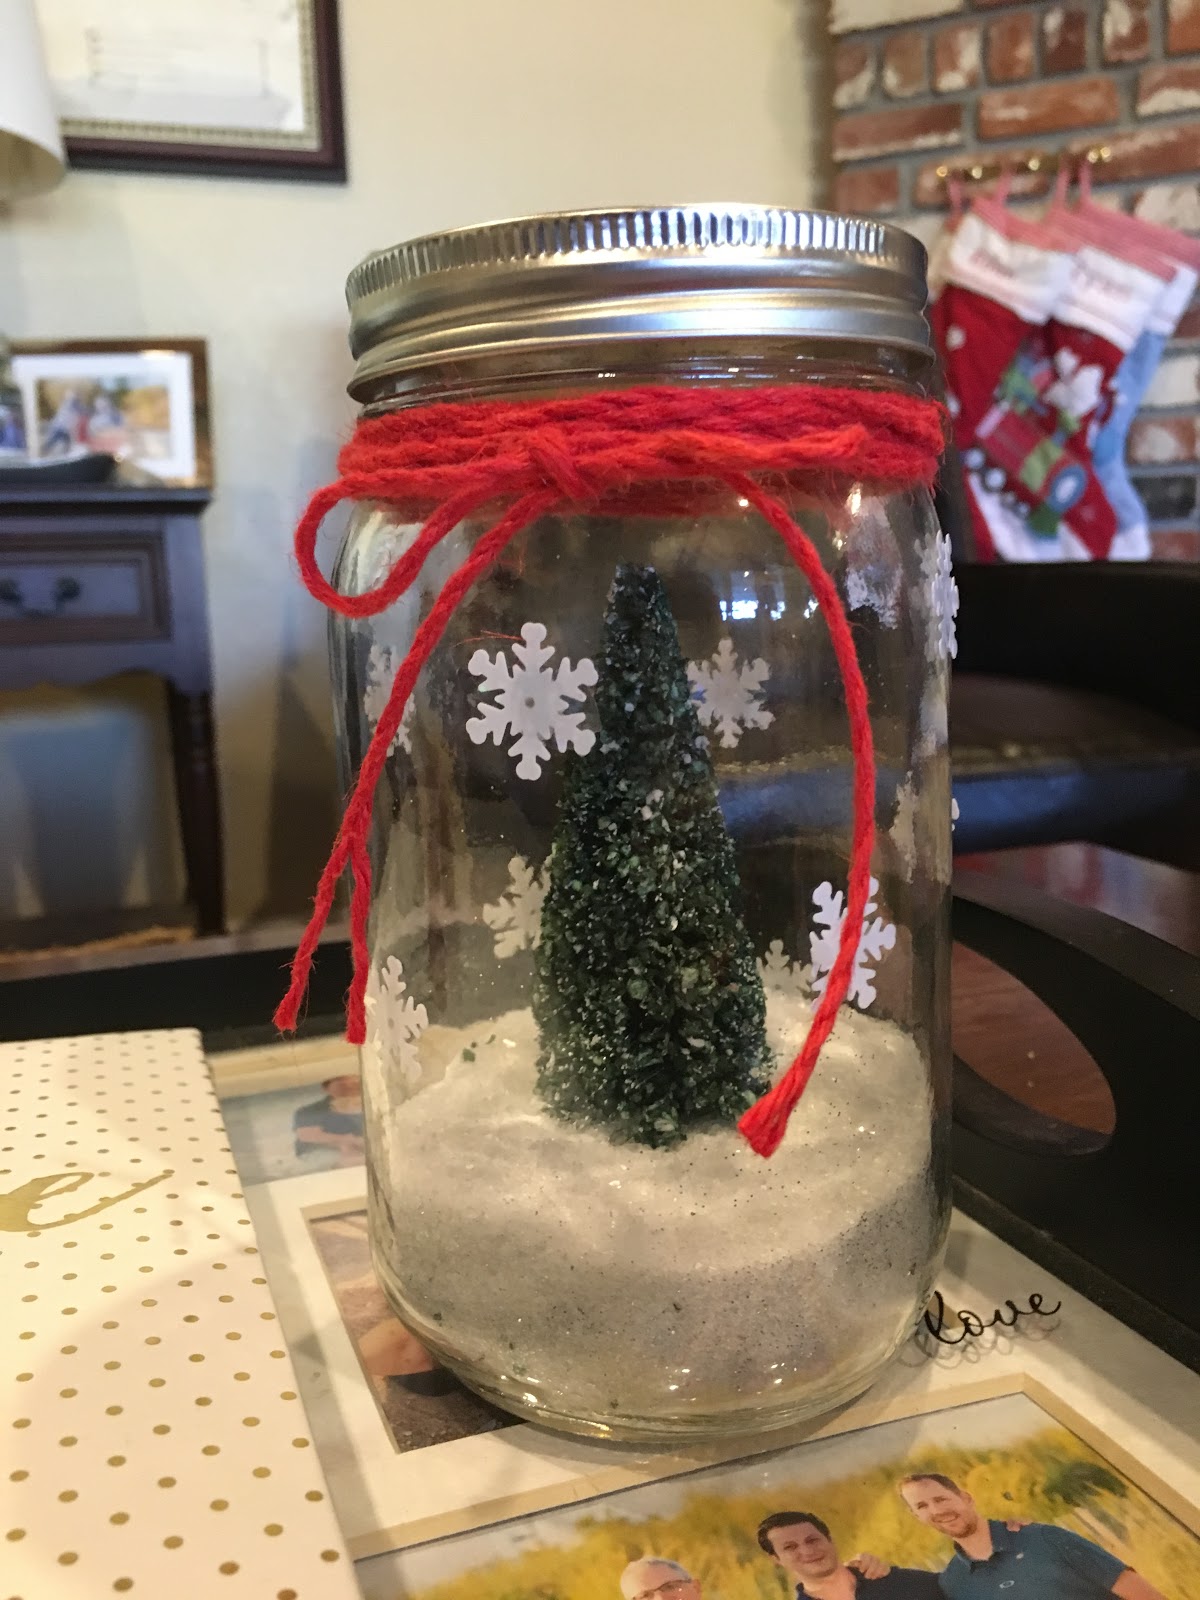
But probably my favorite project was done the next day while I was crafting with my boys. I glued a small fake tree to the bottom of a jar and filled the bottom of the jar with about an inch of epsom salts mixed with a little silver glitter. I glued a few iridescent snowflakes  randomly around the sides using tacky glue, and finished it off with some red twine. It turned into an adorable winter scene on my coffee table!


Friday, November 17, 2017

Fall Craft Party - Foam Pumpkin Decorating!


About nine months ago, I hosted my first craft party for my girlfriends and swore I would start doing them every season. We all even continued to text ideas back and forth as the months rolled by, but I simply never pinned down the right craft or the right time. But when fall started creeping up on us and Michael's started filling up with all the fall decor, I knew my pumpkin-spiced self could wait no more. 

Enter the foam pumpkin.


The idea is simple. Everyone gets a pumpkin and decorates it. No model, no one-size-fits-all, just a pumpkin and your creativity. Although these pumpkins are normally $19.99, I waited until they were 60% off and pounced at them for $8 a piece. Each guest gave $10 per pumpkin to cover the cost of materials (and booze), so it ended up being pretty inexpensive.

I set up a Facebook Event and got to inviting and posting some inspiration from my Pinterest board. So many cute ideas, from Halloween candy bowls to sweet floral centerpieces for Thanksgiving.

Many of the ladies were drawn to a white pumpkin that read, "Give Thanks" in gold vinyl, so I cut out a few vinyl stickers from my Silhouette ahead of time. A friend also requested a vinyl sticker with her family's last name.


I brought out my supplies: acrylic paints, brushes, Sharpie markers, sequins, glue gun...


And I used this craft as an excuse for my newest craft tool: the hot knife

Apparently you *must* have one of these to make easy cuts on these foam pumpkins. I'm not totally convinced it was necessary, but it did make lovely cuts that went very smoothly. Some used it to cut the top off so they could fill the pumpkin with flowers, others carved faces. I might use it again to carve a leftover foam pumpkin into a Jack-o-lantern with my little guys. And for $11 at Michael's (using a 40% off coupon, of course!) it didn't break the bank.

I wanted to get everyone pretty fake flowers to choose from, but man they are not cheap at the craft stores! I found some surprisingly adorable fake foliage at the Dollar Tree to fill out the supplies, and they turned out to be great. 


I mean, LOOK at this little acorn detail! Adorable!


You guys, the pumpkins that came out of this event were just gorgeous! Everyone ended up doing at least two. Some of my favorites were sprinkled with sequins and glitter. But the "Give Thanks" pumpkins with flowers were a real show stopper. For $10 in materials each, these are a knock out. I wasn't too sure about the vinyl sticking to the pumpkins since the surface isn't flat, but the vinyl transferred really well AND the lettering looked great once it was on! 


Now to plan next's season's craft night. I'm really going to stick to doing one per season! Any ideas for a Christmas craft?