Sunday, December 9, 2018

Christmas Card & Matching Gift Tag Tutorial!

Is there anything sweeter than a hand made card? You know, a physical one. Made of paper. With actual human handwriting on the inside because #nostalgia.


Once upon a time, before I even had a Silhouette Cameo, I bought a box full of Christmas-themed scrapbooking paper and supplies from a local Facebook yard sale page on a whim. I had never made a scrapbook in my life (why, when Shutterfly exists, would I do such a thing?), and had no idea what to do with the little embellishments and letter stickers, but I went for it.

I ended up using that paper to make cute handmade gift tags and to decorate brown-paper-wrapped packages for friends and family all cut with *gasp* SCISSORS! Since then, I've upgraded to a Silhouette Cameo cutting machine and more stacks of scrapbook paper than I care to admit, and I still love making handmade tags and cards for birthdays and holidays.

The cool thing about this card is that it will leave you with scraps that include letter cutouts with the same word, making it super easy to make a matching gift tag!


Materials:

Scrapbook paper, in at least three colors
Cutting machine and cut mat
Scotch Adhesive Roller (any kind of glue would also work)
Pre-made blank cards and envelopes (or make your own if you're fancy)
Baker's twine


Instuctions:

First I opened up my Silhouette Studio software and used three separate text boxes to write out the word "JOY" vertically. I used one of my favorite fonts from the Silhouette Design Store called LW Perfect Type. Then I created a box around the word using the Rectangle Tool that would be 1" shorter than the premade card I was going to use (6" for a 5x7 card). I copied the design a few times and cut it out on some printed scrapbook paper. 


As you can see below, cutting out this design leaves some letters on your cut mat. Don't toss those scraps because we will use them later!


Next, I used a paper cutter (although scissors or your Silhouette would work, too) to create a larger rectangle in a lighter colored scrapbook paper that was as tall as the JOY piece, and at least one inch wider on each side.


Next, I lined up the JOY piece (don't forget that little O center!) on top of the larger rectangle and glued it down with my Scotch Adhesive Roller (any paper glue will do). Then I glued that onto the front of a pre-made blank card.


The final touches included creating a white paper liner for the inside of the card, about 1" all around smaller than the card itself to allow a 1/2" border. Use your adhesive roller or glue to attach the liner along the card's inner seam, and tie a piece of baker's twine around the center of the card to hold it together.


Now for the gift tags. Back in Silhouette Design, I created these gift tags in two layers and cut out the top and bottom pieces out of red scrapbook paper and white cardstock. (There are plenty of options in the Silhouette Design Store if you don't want to mess with creating your own design for these.)


Then I used the discarded cut out letters from the JOY card and used my Scotch Adhesive Roller to stick all the layers together. I finished it off with some baker's twine. 


I just love how they turned out! The red scrapbook paper is white on back, so I used that as space to write To/From and a quick note. 


That's it! The great thing about this design is that you can choose whichever word or colors your like. This would look so cute with "MERRY" or with some golds and silvers. 

Happy Crafting!

XOXO,
Rox

Saturday, December 1, 2018

Christmas Activity Advent Calendar Cards

When my first son was still a baby, a coworker of mine told me about her Christmas Activity Advent Calendar. She made cards for each day of December, each with its own simple Christmas activity written on it to do with her girls. They included baking Christmas cookies, donating food to the local food bank, and reading the Polar Express together. I thought this was such a sweet idea, and I knew I wanted to do this with my kids when they were old enough!

Fast forward to today, and I've been doing this for four years now. Read on to see how I put it together and for a free printable of the cards I use! This year, I let the the kids help with cutting out the cards and gluing them on to cardstock, so they have an extra "home made" touch (ie: Type A mom had to suck up the imperfections and go with it!).


Materials:

  • List of activities (see link to my free printable, below!)
  • Blank December calendar (get a free one here)
  • Scrapbook paper or cardstock, cut into small cards
  • Advent Calendar with pockets or doors (we have this one from Pottery Barn Kids)


Instructions:

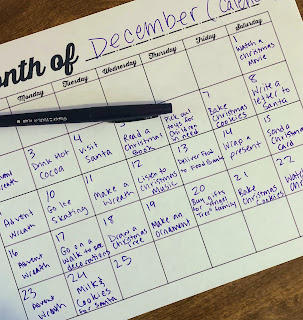
1. Start with a blank December calendar, and fill in all the activities you know you'll be doing already. Schedule those in and write them down on your cards for those days! These types activities for us include:
  • Visiting Santa
  • Attending the local Festival of Lights parade
  • Setting out milk and cookies for Santa on Christmas Eve
  • Going Ice Skating with friends
  • Lighting the Advent Wreath each Sunday


2. Figure out which days of the week are the most hectic for your family, and fill in
"easy" activities on those days. (Repeating these a few times is fine!) For us, these include: 
  • Drink Hot Cocoa
  • Draw a Christmas Tree
  • Read a Christmas Book
  • Watch a Christmas Movie

3. Include the kids in the spirit of giving to others by including gift giving to others as well as acts of charity. I pick one day of the week (Thursdays, for us) to do such activities so it becomes a weekly thing.
  • Deliver food to the local food bank
  • Pick out gently used toys to donate to children in need
  • Purchase gifts for families on our church's "Angel Tree"
  • Wrap a gift
  • Mail a Christmas card

4. Fill in the other days as you like!


5. Write the activities onto your scrapbook paper or cardstock. I printed out the attached PDF and used the print-and-cut feature on my Silhouette Cameo, but scissors work, too! The kids then glued them onto red cardstock, and I added them to our Advent Calendar's pockets.

Check out the link below for a PDF of the cards I created (using some simple, free clip art from the internet for my pre-readers). Feel free to print them out and use them in your Advent Calendar! I just love how my kids look forward to this every day. It's so fun to see them truly enjoy the simple ones, like making and enjoying a cup of hot cocoa together! The simpler, the better. And the best part is that once you plan it ahead of time, you don't have to worry about coming up with a new idea each day (ah-hem, Elf on the Shelf!).


Merry Christmas, and may these simple activities add to the joy in waiting for the coming of Christ!

XOXO,

Rox